Let me tell you, these were worth the wait!
The original pin led me to the BBC Good Food website. You can see the original recipe here. I'm always on the look out for new ways of doing classic recipes, last year I made Jamie Oliver's mince pies (also very yum). I thought this year I'd give these a go.
I'm not really sure what to call these, so i've settled for 'Roly Poly Mince Pie Pastries'
Ingredients:
 50g caster sugar
1 sheet of ready-rolled puff pastry
411g jar traditional mincemeat
1tbsp milk
25g flaked almonds
Optional:
Icing sugar
Glacier Cherries
You'll also need:
Rolling pin
Baking paper/greaseproof paper
Baking tray
1. Scatter the sugar over the worktop, unravel the pastry, then roll it out so it's a quarter bigger, but keeps its rectangular shape.
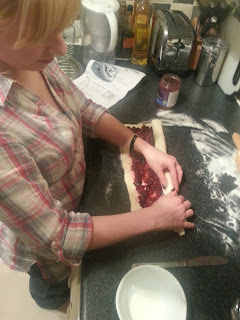
2. Spoon and spread the mincemeat evenly over the pastry leaving a border along the longest edges. Fold one of the longest edges over the mincemeat then roll the pastry tightly into a sausage shape while gently pressing the pastry into the mincemeat. When you get to the other edge, brush it with milk and press down to seal in the mincemeat.
As a result, my pastry roll looked like a squashed catapillar:
Looks kinda gross right??
4. Put the pastry in the fridge for 30 minutes to firm it up. Preheat the oven to 200C/gas 6/ fan 180C. Cut the roll into 12 rounds, about 3cm thick. Lay them evenly spaced on a large, greased baking sheet on a baking tray and flatten them with your hand so they look like squashed Chelsea buns.
As you can see, mine weren't the neatest slices, the pastry teared a little, so some of the mincemeat came out.
5. Scatter the almonds on top and bake for 20-30 minutes until golden brown and the mincemeat sizzles.
Sorry this picture is so blurry, I think my camera lens got fogged up, but you get the idea! I left mine in for a little too long, you want them lighter than the ones in this picture!
6. Leave to cool for 5 minutes - keep them separate so they don't stick together - Haha, yeah right! They will probably get stuck together, especially if you mincemeat oozes out like mine. Just make sure your baking tray is properly greased!
I then added two steps of my own:
7. Once cooled, make up some icing using a minimal amount of water, you want a fairly thick consistency. Swirl the icing over the pastries, making a blob in the middle for your cherry. Put half a glacier cherry on each pastry.
I really recommend icing them, though feel free to leave off the cherry if you're not keen on them. They made my slightly overcooked pastries really moist and yummy!
I'm not very experienced with using pastry, so I did find it a bit fiddly and awkward at first. However, despite oozing mincemeat and slight overcooking these pastries were really tasty and definitely worth the effort. The preparation doesn't take long, though you have to take the 30 mins chilling time into consideration. I think I may have been a little hasty in getting the pastry out of the fridge which may be why it tore.
"These were really tasty, I think the icing and the cherries really made it something special. It's a great alternative for the traditional mince pie. I'd happily eat these all year round!"
If you have any leftover mincemeat, or find any in the sales, give these a go, I promise you won't regret it!
Is there a particular pin you would like to see me try? If you look on the left side of this blog under the section 'About Me' you'll see a heading 'Pinterest'. If you click on the image it will take you to my Pinterest page where you can see all the things I've pinned. Comment on this post if there is anything in particular you'd like to see me attempt and I'll do my best! Otherwise I'll choose something at random for my next post!


No comments:
Post a Comment