Monday 24 December 2012

Jazzed Up Fairy Lights! Pin.006

Hello and Merry Christmas! Forgive the shortness of this post but hungry husband and I are currently on holiday and have hardly any phone signal/internet!

Anyway onto this short post. Though I decided to do 2 pins this week.. I so far have only been successful in doing one! This is a great way of updating your fairy lights. So here goes:

'Jazzed Up Fairy Lights!'
Another super easy pin. When I clicked on the pin it said 'blog not found'. Boo.

You will need:
Fairy lights (I used 2 sets of battery powered lights from Wilko's and joined them together). You ideally want lights with a clear or white wire, a green or back wire doesn't look so good. Battery powered lights have the benefit of being able to be used anywhere.
Organza Ribbon or 'Tulle' fabric
And that's it!

I tried two different ways of using the lights, I'll put both here and you can decide for yourselves which you like best!

Method 1: Find a nice sized vase and wrap the ribbon around the outside of the vase. You'll find if the ribbon has been stored on a reel it will easily fit into the vase. Secure the ribbon with sellotape and put the lights in, making sure any switches are accessible near the top of the vase.


It will look something like this:


Method 2: Cut roughly small strips of Organza ribbon and tie round the lights at regular intervals. Continue tying ribbon all the way down the lights, the more ties the better. (This was the method I liked best).


Personally I prefer the second way but I think both look nice. 
I like it, it was simple, quick, cheap and effective. The lights I used weren't actually as blue as the picture, they were white lights. Warm white lights and/or cream ribbon may have worked better, but I couldn't find any! It's nothing to write home about but it has a nice effect...

Soon to come....  'Roly Poly Mince Pies!'


Monday 17 December 2012

Oh Sew Simple Gift Tags! Pin.005


Here's my pin number 5! This is my jazzed up version of the original pin posted below. The original was pretty in a minimalist kind of way but not really me.. You can find the original pin here which will take you to the blog Simple Pretty. The blog then directed me to the etsy site where you can buy 6 of these gift tags for $10. (Or if you prefer you can follow my tutorial below and make your own!)


These were so easy I'm not even sure I can call this a tutorial.. but hey, here's my tutorial for 'Oh Sew Simple Gift Tags'...

You will need:
Card (I used left-over lined note cards from my student days.. )
Thread of various colours
Needle
Left over buttons/sequins
String/twine
Hole puncher

And that's all!

First I cut off the top section of the note card to get rid of the ugly blue line...


On the left side of the card I drew a vertical line. I then chose some pretty thread and a matching button...


And used backstitch to sew down the vertical grey line with the pink thread and did two cross-stitches at the end. If you're lucky enough to have a sewing machine then make use of it, as it will make the job much quicker! However, if like me you haven't got one, you can just do it by hand.


It doesn't matter if the line isn't perfectly straight, it gives that 'home-made' feel to it (well... that's what I told myself!). You can use any stitch you like. I remember backstitch from my school days but if you're not familiar with it, it's really easy:
I then did another line across the top like this:


Put the two coloured threads together and sewed on the button...


Used the holepunch and attached the twine. And hey presto! It's complete!


I will stencil on the names once I decide who to give them to (with ink pen, I am not ready to try paint again after the trouble I had with my last pin... shudder...). I did three different designs, which one do you like best?

As long as you have the hang of running stitch and backstitch you'll find it easy enough, and even easier if you have a sewing machine. I would advise sewing along the lines as it much easier to get a straight(ish) line. It does take a little time, so not so useful as a last minute save!

I really like them... They're really nice to use for a special gift. It's also a good way of using up note cards that would have just been gathering dust. BUT in my opinion it's a fair bit of effort for something that will, in all likelihood, get chucked in the bin. To make them more of a keepsake maybe you could write sayings or phrases on them and then attach magnets to the back to make a fridge magnet? Or you could tie them onto door handles as decoration? Do you have any other ideas? 

Double pin time! Because it's nearly Christmas I will attempt two pins this week. Am I mad? Yes, Yes I am!

'Pretty Christmas Lights'
and... 'Roly-Poly Mince Pies' - these look yum!
For some reason comments have been disabled on here for people not using Gmail, but it now works (hopefully!)

Sunday 9 December 2012

Christmas Card Holder! Pin.004


I was looking forward to doing this pin, as one of my favourite parts of Christmas is decorating the flat and making it Christmassy! We don't have a tree because we haven't got the space (and I dread to think what would happen to it if our kitty Pandora got her paws on it!)... So we decorate in other ways!


Mrs Dinner Therapy gave me my first Christmas card last week (yes she is eager!) but what to do with it? I know I'll make a Christmas card holder!

I pinned this about 6 weeks ago, thinking 'I bet that's easy to do'. When it came to doing the pin I clicked on the link and it took me to 'The Anderson Crew' which featured a picture of the card holder. Charming blog but shock horror! Where is the tutorial for this pin?! There was none!

So yes.. consider this post a tutorial for 'Make your own Christmas Card Holder', or rather.. 'How not to do it!' I made it up as I went along (as I do with most things!). I did it from scratch, but feel free to find a nice Christmas sign and use that instead!

You will need:
Wood/sturdy cardboard
Sandpaper (if using wood)
Patterned paper
Clear varnish/PVA glue
Pritt Stick or similar
LaserJet or InkJet Printer
Good quality ribbon (2-3m)
Superglue
Pegs

I decided to use another leftover piece of wood as I thought it would be more durable than cardboard. I sanded down the wood first so it was smooth:


And I bought some red spray paint and thought I'd try stenciling on the letters for 'Merry Christmas':


But it came out all blurry like this:


The paint bled into the wood.. I don't know if I should have primed it or something first? Needless to say it didn't look good :-( I sprayed it all over with the red paint, but it also didn't look good! Plus the red paint was reeeeally messy! It also looked a little too much like blood which freaked me out!


I tried stencilling the letters onto silver card, which I would then stick on the wood...


But as you can see this didn't work out either! So I tried painting on the previously painted red wood...


This didn't look good either... so I started again. I used a different piece of wood and I used a template from 'Today's Fabulous Finds' and used the method from one of my previous posts: Paint Stirrer Signs.


I printed on patterned paper, put it in the fridge for about 20 mins or so to dry. I then stuck it onto the wood, and varnished it. The printed ink blurred a little, probably because I didn't let it dry long enough. It looked much better than my previous attempt though!

UPDATE...

Okay so I left it overnight for the varnish to dry and today I added the ribbon...


My original plan was to use my hot glue gun but I found that the glue didn't attach to the ribbon very well, and would peel off if you put too much pressure on the ribbon. So I used superglue instead. I left the ribbon really long, so that I can cut as much off as I need to when it's hung up.


I'm planning on attaching a hook so that I can hang it on the wall, but I need to pop to B&Q to get some. So for now it is sitting on my bookcase. I'm hoping that it will still be there tomorrow morning after Pandora has had free reign of the lounge!


This was tricky... especially if you try do it the way it looks in the picture. Using spray paint and stencils is really time consuming and messy as you have to wait for each letter to dry before you move on. It worked much better printing the image and sticking it onto the wood.. OR even better.. BUY a Christmas sign and attach the ribbon!
It was okay, it didn't help that there was no tutorial, and I really didn't know what I was doing! I think I will attempt stencilling again when I've done a bit of research! I'm fairly happy with it though, and looking forward to hanging it up, and filling it with Christmas cards!

UPDATE... It took a while but here it is hanging proudly on the door, I love it!


Click on the image below to see Pin. 005 'Oh Sew Simple Gift Tags!'. Simple but cute gift tags, suitable for Christmas or Birthdays or whatever!


Sunday 2 December 2012

Microwave Chocolate Mug Brownie! Pin.003


Time for pin number three.. I've been looking forward to trying this for ages as it looks yum! The recipe asks for ingredients that most people have already. You'll be pleased to hear that I kept to the instructions this time.. well... pretty much.. bit of a theme here!

This pin is originally from Food.com. The recipe says "Total Time: 2 mins". Hmmm... that's optimistic! Well, we shall see!

Microwave Chocolate Mug Brownie:
Ingredients:
2 tbsp melted butter (I used 'Utterly Butterly')
2 tbsp water
1/4 tsp vanilla extract or double the amount (1/2 tsp) if using vanilla essence.
1 dash of salt
4 tbsp granulated sugar
2 tbsp unsweetened cocoa powder
4 tbsp all-purpose flour

UPDATE: You HAVE to try this with chocolate chips! Heavenly!

You'll need a microwave and a fairly big mug to put your ingredients in. I used the biggest one I had:

But in reality one half the size probably would have been fine. Because you cook the brownie in the microwave and the mixture doesn't contain baking powder the brownie doesn't rise very much.

1. "In a 12 oz coffee mug, add water, butter, vanilla and dash of salt. Whisk well."
You need to melt the butter first, so weigh out the butter then put in the microwave on a low heat for about 5 seconds. I put mine on for too long and got butter all over the top of the microwave.. woopsie.


Then add all the other ingredients. I did this brownie twice (Lucky Hungry Husband!), the second time I used 1/2 tsp of vanilla essence, because I found 1/4tsp wasn't enough. If you're using vanilla essence, you need to double the amount. I wasn't sure how much a 'dash' of salt was so I just put in a sprinkle. I whisked it with a fork.

2. "Add cocoa powder, whisk well. Add sugar, whisk well. Add flour, whisk well."


It uses quite a bit of cocoa powder which is a downside to the recipe. With a standard size (125g) pot of cocoa powder you'd only get 8 microwave chocolate mug brownies... I very rarely use cocoa powder so maybe this isn't so unusual? I find flour very messy, I always get it everywhere... as you can see! If you are going to use chocolate chips, add them now!

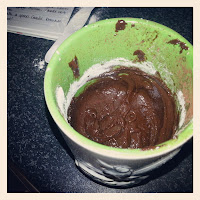
Stir well and you should get a stodgy consistency that looks something like this: 


3. "Microwave for 60 to 90 seconds. Center should be slightly molten. Careful not to overcook." This is where it went a bit pear shaped... 

There's a note on the webpage that says that they used a 1500 watt microwave and put it in for 60 seconds. I have an 800 watt microwave so I figured I'd try 40 seconds. This is what it looked like:

It's difficult to see from the picture but it really was not cooked. So I put it in for another 30 seconds...

Oh dear. One very overcooked brownie. It was edible, but it was pretty dried out in the middle and there definitely wasn't a molten centre!

I did the second brownie for 60 seconds and it looked like this:


It was much better! The middle was all gooey and yum. As there isn't a big margin for error, I suggest putting the brownie in the microwave for 40 seconds and then doing 10 second increments, checking it each time, but you probably won't need more than 60 seconds.

4. "Enjoy with a spoon. Careful brownie will be hot.
(In case you were considering trying to drink it!) that did make me laugh!

UPDATE: Having done this recipe more times than I'd like to admit.. I definitely recommend the addition of chocolate chips... *drool*...

It is easypeasy, microwaving times aside, you can't go wrong. Just remember, 40 seconds in the microwave and increments of 10 seconds 'till it's done. It's best when it's all gooey. Don't cook it 'till it has the consistency of cotton wool like I did.

It was tasty! Especially the second time. However I would call it more a chocolate pudding than a brownie. It didn't have that sugary fudgy texture that a brownie has. Timing wise.. 2 minutes was optimistic, the quickest I managed was 6 mins, 45 secs! (including microwave time). I reckon that's still pretty quick though. Can any of you do it quicker? It's a great recipe when you're craving something sweet, don't have any chocolate in the cupboard and you don't have a lot of time.

Hungry husband was feeling a bit camera shy but let me get his moosetache in the pic. He's doing Movember by the way!


'It doesn't have quite the 'wow' factor' that the nutella cupcakes had. However, It's an extremely tasty dessert, to give it four stars, it needs chunks of chocolate chips or marshmallows.


Cor! He doesn't ask for much does he? ; ) Hungry Husband will need to go on a diet at this rate, teehee!

Hungry Husband and I are getting in the Christmassy mood, we don't have space for a tree but here's our efforts so far:


Have you got your Christmas decorations up yet? Click on the image below to see my first Christmassy Pin Post. 004: 'Ribbon Christmas Card Holder!'... Exciting! I love Christmas!