Showing posts with label Cute. Show all posts

Monday, 23 March 2015

Wedding Card Album Pin.013

Me and the hubster will have been married 6 years this July (which feels a little bit mad!). Soon after we got married I decided to make a wedding scrapbook of all our favourite photographs, including things like our order of service, nameplaces and table cards. So off I went to Hobbycraft and splashed out on craft paper, ribbon, decals etc.

5 1/2 years later I am sorry to say that we still don't have a wedding scrapbook, or a photo album! I told myself that it was because I was too busy and didn't have the time to just sit down and get it done. Weekends and holidays came and went and I realised it wasn't that I didn't have the time. I just didn't want to do it! It held no appeal for me at all!

Anyway, while forcing myself to start putting it together, I came across all our wedding cards, which are such a lovely reminder of our day. I realised I wasn't going to be able to put them all in the scrapbook and I didn't want to throw them away either.

Then I remembered something I'd seen on Pinterest a while ago - a wedding card album! Desperate to avoid working on my scrapbook I decided to give it a go.

This is the pin below. Click on it to go to the tutorial:


Here's my version:


A couple of tips if you want to try this:
  • Use cardboard for the covers (stronger the better). I didn't have any so I used heavyweight painting paper but it is not as sturdy.
  • You don't need to use a 'croc-a-dile' hole punch as described. Instead draw a dot where you want the hole to be, take the bottom cover/tray off of a normal sturdy hole punch. Turn hole punch over and line up the dot so it is in the middle of the hole. However make sure you don't hole punch another piece of your work by accident (like I did!).
  • The 'brads' described are paper fasteners. I couldn't be bothered with this so used glue dots instead to fix on the ribbon. It worked fine, though you can see the glue dots through the ribbon, depends how fussy you are!
  • Consider using hole re-inforcers (whsmiths or similar)
Verdict: A good tutorial and a nice way to keep all your wedding cards. Because my wedding cards were all different sizes it doesn't 'sit' as nicely as the original but I'm still happy enough with the way it turned out!


I suppose I better get on with that wedding album now...

Monday, 1 December 2014

Ripple Baby Blanket Pin.012

I have finished my second crochet project! Hurrah! And you'll be pleased to hear that it didn't take the 9 months or so that the first one did (although it is a fair bit smaller!).

A rippled baby blanket (sorry not a great picture).


Unfortunately it did take a bit longer than it should have as I hit a few problems along the way, resulting in unpicking hours of work.. sob sob.. I literally was finishing it off in the car on the way to see my friend for her baby shower! It took about a month altogether, though the pattern asked for 55 rows and I was a few short.

You get the ripple effect by using increasing and decreasing stitches that sort of force your crochet into a wave like pattern. It's a very cool effect!

In the end it wasn't really much of a surprise for my friend had seen my half a dozen 'ripple crochet blanket' pins on pinterest!

I used a tutorial from Daisy Cottage Designs (Pin below). However as a beginner crocheter(?) I found it really difficult to make heads or tails of. I'm still not quite sure where I went wrong with interpreting her instructions, as I had lots of chain stitch left over, and an odd amount of stitches. In the end I sort of improvised and fortunately it worked!


If you want to give the ripple blanket a go I would recommend following the pattern from Very Pink Knits. There's a video so you can see how to the stitches and do it along with her. I wish I had found this pattern before I started with the one above, I would have saved myself a lot of stress! Be aware than in any American tutorials they use the term 'double crochet' for what we in the UK would call a 'Treble'. It's also important to maintain the same tension throughout, I tend to crochet quite tightly (something I need to work on) but I got a bit lazy towards the end and was crocheting looser. This resulted in a very wonky blanket, and I had to unpick about 8 rows and redo them all!

For anyone wanting to learn how to crochet, check out Girlybunches tutorials on youtube. It's much easier to get head round it by seeing someone do it than looking at pictures etc. And she goes through all the basics as well as more advanced stitches and projects.

Hmm.. what shall I crochet next? Keep posted for the furniture upcycling me and the hubster are currently working on...

Sunday, 3 March 2013

A Message to You Photo Frame! Pin.010


Hello all! Time for another pin post! Clicking on the pin took me to Jill Ruth & Co. This pin (like all the others) is super easy peasy. All you need is:


A fairly large photo frame, the one I used was 15cm x 20cm.
Scrapbook paper
Dry erase marker pen


And that is it!


Take a piece of scrapbook paper and trim as necessary. Plain or lightly patterned paper like this one works best.

Put the scrapbook paper into the frame..


And write your chosen message! You can't get easier than this! Here are some possible uses for the Message Photo Frame:


So there you have it. One Message Photo Frame. Wipe off and change the message as often as you like, use as a reminder, shopping list, message to a loved one etc etc! Also change the background whenever you like, just change the scrapbook paper!
I love it, SO ridiculously easy to do, both cute and practical! What more could you want from a pin?

Tuesday, 29 January 2013

Origami Paper Stars! Pin.009


Hello all! so I was considering which pin to do this week when I came across this tutorial for origami stars by Minna May. The great thing about this pin is that all you need is a piece of paper! the stars can be used for loads of things... cards, decorations... um.. cards and decorations??

Okay so I'm feeling particularly unimaginative right now but I'm sure you can think of lots of things to use them for... right?

Anyways... They were quite fun to do, quite quick and not too tricky after a bit of practice. I practised with plain white A4 paper then used the pretty patterned paper afterwards.


Got an A4 piece of paper? Then you're ready to rumble!


The tutorial asks for strips of paper 8.5" x 0.5". However, the shorter side of A4 is 8.3" so I used that measurement and it worked fine :)


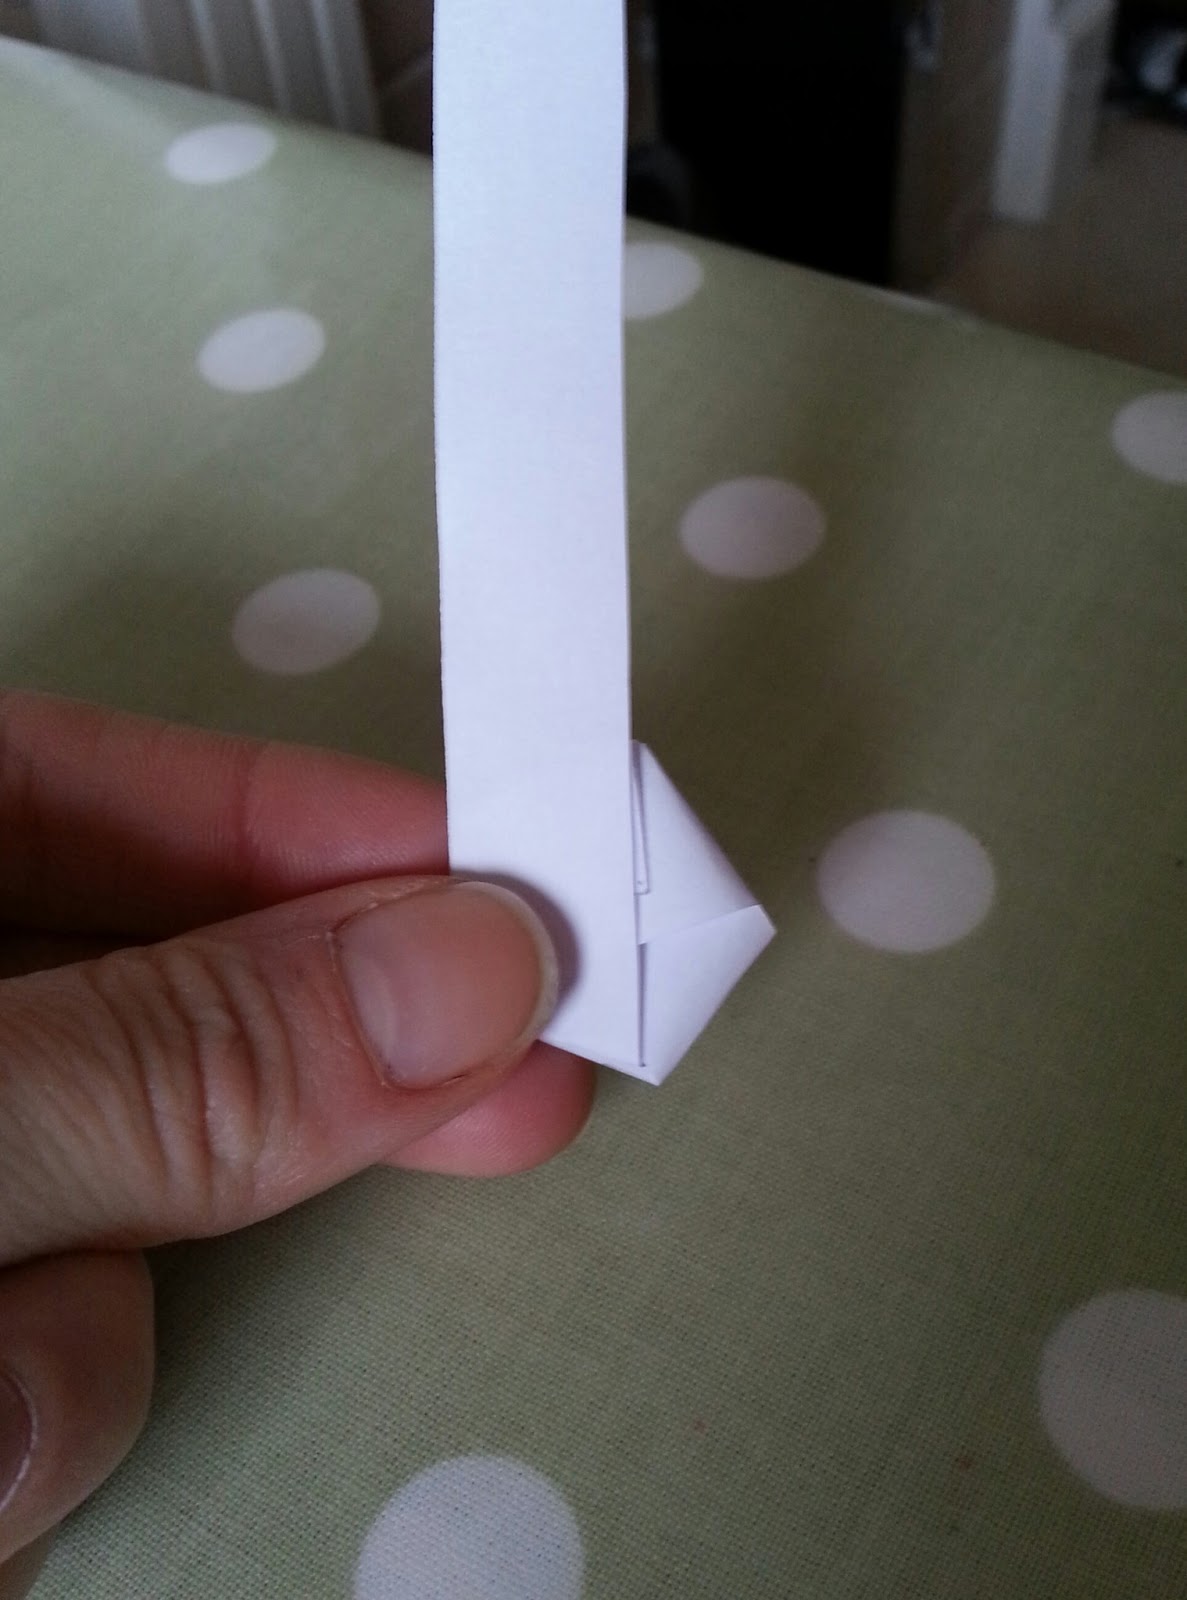
Make a ribbon shape with the paper, fiddle around with it until it looks like this:


Poke the short tab inside the hole and gently pull through


You then need to flattern the paper a bit and fold over the excess tab:


Then begin folding the long strip of paper over the base of the star:


 And fold it over the back of the star:


And keep going. You will find that the paper sits comfortably in one direction so you don't have to worry too much about folding it in the wrong angle. Eventually you'll get to the end of the strip of paper and have something that looks like this:


You then need to tuck the tab inside the folds so it's hidden. Like this:


And you should have something like this:


The next bit required two hands so I couldn't take a picture, so I have borrowed one from Minna May. Holding the star, push your nail into each side of the star, forcing it into a star shape.


And Ta Da! You are finished!


Like I said before, it takes a bit of patience and practice, but they came out really nice! It's trickier with thicker paper, but I think the trick is to make sure the stars are folded quite tight - though take care not to tear them!


It took a couple of attempts, but I soon got the hang of making these stars. To do it properly it's not super quick but it doesn't take ages either! I think they look best on pretty patterned paper. I have yet to use them for anything but I'm impressed with how well these came out. I am by no means a seasoned origami maker! Please let me know if my instructions need clarifying - it's a hard thing to describe!

Monday, 17 December 2012

Oh Sew Simple Gift Tags! Pin.005


Here's my pin number 5! This is my jazzed up version of the original pin posted below. The original was pretty in a minimalist kind of way but not really me.. You can find the original pin here which will take you to the blog Simple Pretty. The blog then directed me to the etsy site where you can buy 6 of these gift tags for $10. (Or if you prefer you can follow my tutorial below and make your own!)


These were so easy I'm not even sure I can call this a tutorial.. but hey, here's my tutorial for 'Oh Sew Simple Gift Tags'...

You will need:
Card (I used left-over lined note cards from my student days.. )
Thread of various colours
Needle
Left over buttons/sequins
String/twine
Hole puncher

And that's all!

First I cut off the top section of the note card to get rid of the ugly blue line...


On the left side of the card I drew a vertical line. I then chose some pretty thread and a matching button...


And used backstitch to sew down the vertical grey line with the pink thread and did two cross-stitches at the end. If you're lucky enough to have a sewing machine then make use of it, as it will make the job much quicker! However, if like me you haven't got one, you can just do it by hand.


It doesn't matter if the line isn't perfectly straight, it gives that 'home-made' feel to it (well... that's what I told myself!). You can use any stitch you like. I remember backstitch from my school days but if you're not familiar with it, it's really easy:
I then did another line across the top like this:


Put the two coloured threads together and sewed on the button...


Used the holepunch and attached the twine. And hey presto! It's complete!


I will stencil on the names once I decide who to give them to (with ink pen, I am not ready to try paint again after the trouble I had with my last pin... shudder...). I did three different designs, which one do you like best?

As long as you have the hang of running stitch and backstitch you'll find it easy enough, and even easier if you have a sewing machine. I would advise sewing along the lines as it much easier to get a straight(ish) line. It does take a little time, so not so useful as a last minute save!

I really like them... They're really nice to use for a special gift. It's also a good way of using up note cards that would have just been gathering dust. BUT in my opinion it's a fair bit of effort for something that will, in all likelihood, get chucked in the bin. To make them more of a keepsake maybe you could write sayings or phrases on them and then attach magnets to the back to make a fridge magnet? Or you could tie them onto door handles as decoration? Do you have any other ideas? 

Double pin time! Because it's nearly Christmas I will attempt two pins this week. Am I mad? Yes, Yes I am!

'Pretty Christmas Lights'
and... 'Roly-Poly Mince Pies' - these look yum!
For some reason comments have been disabled on here for people not using Gmail, but it now works (hopefully!)

Sunday, 9 December 2012

Christmas Card Holder! Pin.004


I was looking forward to doing this pin, as one of my favourite parts of Christmas is decorating the flat and making it Christmassy! We don't have a tree because we haven't got the space (and I dread to think what would happen to it if our kitty Pandora got her paws on it!)... So we decorate in other ways!


Mrs Dinner Therapy gave me my first Christmas card last week (yes she is eager!) but what to do with it? I know I'll make a Christmas card holder!

I pinned this about 6 weeks ago, thinking 'I bet that's easy to do'. When it came to doing the pin I clicked on the link and it took me to 'The Anderson Crew' which featured a picture of the card holder. Charming blog but shock horror! Where is the tutorial for this pin?! There was none!

So yes.. consider this post a tutorial for 'Make your own Christmas Card Holder', or rather.. 'How not to do it!' I made it up as I went along (as I do with most things!). I did it from scratch, but feel free to find a nice Christmas sign and use that instead!

You will need:
Wood/sturdy cardboard
Sandpaper (if using wood)
Patterned paper
Clear varnish/PVA glue
Pritt Stick or similar
LaserJet or InkJet Printer
Good quality ribbon (2-3m)
Superglue
Pegs

I decided to use another leftover piece of wood as I thought it would be more durable than cardboard. I sanded down the wood first so it was smooth:


And I bought some red spray paint and thought I'd try stenciling on the letters for 'Merry Christmas':


But it came out all blurry like this:


The paint bled into the wood.. I don't know if I should have primed it or something first? Needless to say it didn't look good :-( I sprayed it all over with the red paint, but it also didn't look good! Plus the red paint was reeeeally messy! It also looked a little too much like blood which freaked me out!


I tried stencilling the letters onto silver card, which I would then stick on the wood...


But as you can see this didn't work out either! So I tried painting on the previously painted red wood...


This didn't look good either... so I started again. I used a different piece of wood and I used a template from 'Today's Fabulous Finds' and used the method from one of my previous posts: Paint Stirrer Signs.


I printed on patterned paper, put it in the fridge for about 20 mins or so to dry. I then stuck it onto the wood, and varnished it. The printed ink blurred a little, probably because I didn't let it dry long enough. It looked much better than my previous attempt though!

UPDATE...

Okay so I left it overnight for the varnish to dry and today I added the ribbon...


My original plan was to use my hot glue gun but I found that the glue didn't attach to the ribbon very well, and would peel off if you put too much pressure on the ribbon. So I used superglue instead. I left the ribbon really long, so that I can cut as much off as I need to when it's hung up.


I'm planning on attaching a hook so that I can hang it on the wall, but I need to pop to B&Q to get some. So for now it is sitting on my bookcase. I'm hoping that it will still be there tomorrow morning after Pandora has had free reign of the lounge!


This was tricky... especially if you try do it the way it looks in the picture. Using spray paint and stencils is really time consuming and messy as you have to wait for each letter to dry before you move on. It worked much better printing the image and sticking it onto the wood.. OR even better.. BUY a Christmas sign and attach the ribbon!
It was okay, it didn't help that there was no tutorial, and I really didn't know what I was doing! I think I will attempt stencilling again when I've done a bit of research! I'm fairly happy with it though, and looking forward to hanging it up, and filling it with Christmas cards!

UPDATE... It took a while but here it is hanging proudly on the door, I love it!


Click on the image below to see Pin. 005 'Oh Sew Simple Gift Tags!'. Simple but cute gift tags, suitable for Christmas or Birthdays or whatever!